The Art of Queen Bee Rearing: A Guide for Beekeepers
Raising queen bees is one of the most fascinating and rewarding aspects of beekeeping. A strong, healthy queen is the foundation of a thriving colony, ensuring good genetics, productivity, and stability. Whether you’re a hobbyist beekeeper or running a large-scale apiary, understanding the fundamentals of queen rearing can greatly improve your beekeeping success.
Why Rear Your Own Queens?
Rearing your own queens provides several benefits:
-
Colony Improvement – You can select for desirable traits like gentleness, honey production, and disease resistance.
-
Cost Savings – Buying queens can be expensive; raising your own reduces dependency on external suppliers.
-
Availability – Ensures you always have queens ready for requeening or making splits.
-
Stronger Colonies – Locally raised queens are better adapted to your environment.
The Basics of Queen Rearing
Queen bees develop from fertilized eggs just like worker bees, but they are fed a steady diet of royal jelly, which triggers their development into reproductive females. The queen-rearing process generally follows these steps:
1. Selecting Breeder Queens
Start with strong, productive, and disease-resistant colonies to ensure high-quality queens. The mother queen should have desirable traits such as gentleness, longevity, and excellent brood patterns.
2. Creating a Queenless Cell Builder Colony
To rear queens, you need a colony that is desperate to raise a new queen. This can be done by:
-
Removing the current queen.
-
Adding frames of young larvae from a strong hive.
-
Ensuring an abundant supply of nurse bees to care for the developing queens.
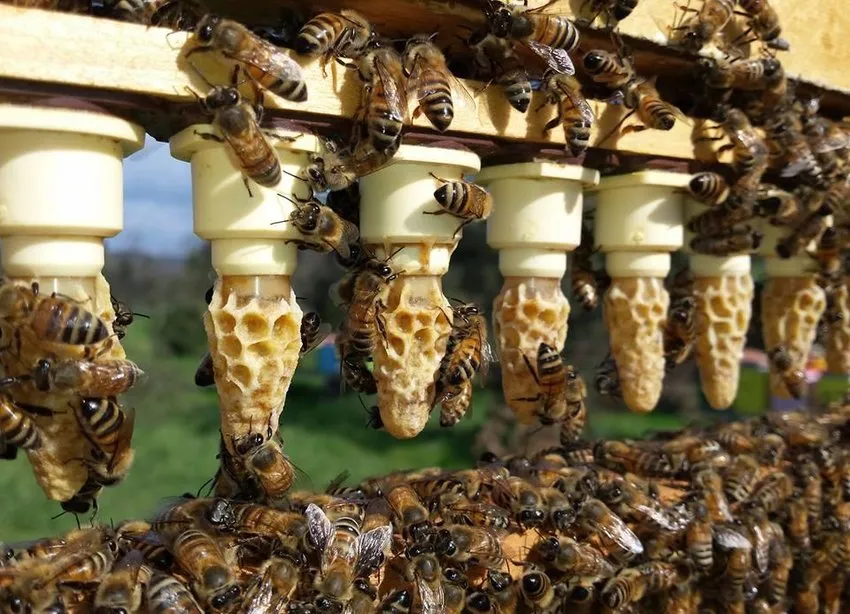
3. Grafting Larvae
Grafting is a method where young larvae (less than 24 hours old) are transferred into artificial queen cups. These cups are then placed into the queenless colony, where worker bees will begin feeding them royal jelly.
4. Using the Natural Swarm or Split Method
For those who prefer a more natural approach, you can:
-
Encourage swarming by overcrowding a hive.
-
Make splits by dividing a strong hive and letting the bees raise their own queen.
-
Use the Miller Method or Hopkins Method, where bees are given frames with young larvae to raise queens naturally.
5. Queen Cell Development and Caging
After 10–12 days, the queen cells will be capped. Around day 14-15, they are ready to be transferred into mating nucs. By day 16, the new queens will emerge.
6. Mating the Queen
Once emerged, the virgin queen needs time to mature and take her mating flights. She will mate with multiple drones in the air, usually within the first week of her adult life. A well-mated queen will start laying eggs within 2-3 weeks.
7. Introducing the New Queen
Once the queen is successfully mated, she can be introduced into a new colony or used for requeening. Beekeepers often use queen cages to introduce her gradually, preventing colony rejection.
Tips for Successful Queen Rearing
-
Timing is Key – Ensure there are plenty of drones available for mating.
-
Healthy Colonies Matter – Provide plenty of nurse bees, food, and pollen.
-
Avoid Inbreeding – Rotate genetics by introducing new breeder queens periodically.
-
Patience and Observation – Check on queen cells but avoid unnecessary disturbances.
Conclusion
Queen rearing is an essential skill for beekeepers looking to maintain strong and productive hives. By selecting high-quality stock and following best practices, you can raise queens that contribute to the health and sustainability of your apiary. Whether using grafting, splits, or natural methods, the process is both an art and a science—one that rewards beekeepers with thriving colonies and abundant honey harvests.
Are you ready to try raising your own queens? Share your experiences and questions in the comments below!